Pages

Tuesday, 31 December 2013

Its a Dog's life

Here we are starting a New Year already, wow how time has flown. Luckily I am still finding plenty of time to craft.  Here at Creative Craft Cottage we are starting the new year with a wonderful challenge "Quote Me" which has our entire DT using the awesome quote sheets from our latest sponsor Imagineif.   By participating in this challenge you are in with the chance of winning some of these quote sheets for yourself.  Please go over to her website to see all the other goodies she has on offer. 
Here is my layout using a quote from her "I love my dog" sheet:

 
Here I've started with G45 'Steampunk Spells' paper which I punched with the Martha Stewart Doily punch to create the round page - LOVE IT ! ! !  As the paper was so bold I had to keep the rest of the page rather quiet, so the embellishments are rather limited. 
I've layered the photo upon some muslim, then created the big gold flower, added burlap roses & a mini rose.  The Dusty Attic Grass Clusters #1 DA0660 & Mini Grass Clusters DA0786 were painted then I flocked the flowerheads.  A tag tucked under the photo hides the journaling. 
 
The gorgeous quote I've used says  "What a beautiful world it would be if people had HEARTS like dogs".  How true.  I thought the saying matches this lovely photo of our son's dog Shadow, with his big kind eyes and that big smile.  Doesn't he just make you melt?
 
I've had fun making this page to share with you all, and am looking forward to seeing all your lovely creations as well.  Remember if you don't have a blog to link your entry, please email your photo thru to us and we will enter it for you. 
 
Thank you for visiting, and please leave a comment as I love to hear what you think.

Thursday, 26 December 2013

Art Journal 5

Wow the time has gone so fast, here we are with Christmas already just a memory.  Its been such fun making Christmas related articles  (cards, decorations, layouts, gifts) so now its great to get back into something more normal again.

Here is my creation in the next Art Journal with the girls at Creative Dreams.  There was no theme to follow in this one so I hope the owner likes what I've done for her.

 
I came across these gorgeous serviettes, so was determined to use the poppies somehow.  Firstly I  painted the background, then modge podged the serviettes and lettering.  The resulting pages are as touch as leather (literally).  I couldn't find many 'poppy' related sayings, so had to use these lines from this timeless poem by John McCrae.  Lastly I added the little 'rows' of crosses.
 
I love the colours in this page and am very happy with the end result.  This has now been posted onto the next person in the group, so bring on the next one.  
 

Monday, 23 December 2013

Old Tin

Today's layout is the first layout I am creating for Once Upon a Sketch where they offer a monthly sketch challenge.  I believe this site is Australian based (please correct me if I am wrong). 
 
I started by turning the sketch once anti clockwise as this suited my photo better.
I have used G45 paper from the Ladies Diary collection, which I distressed the edges, then stitched around.  Next came some lovely texture.  Out came the stamps and stencils.  Spots around the edges, script stamping under the inside edges, and some texture paste script in between.


Believe it or not the blue doily is actually only scraps from the Martha Stewart circle punch set, which has been inked, I also tucked a little bit of muslim under this layer.   More stitching on the next layer, then a couple of small doily's.  Lastly comes some script paper and a black photo matt, which really didn't look right being straight and 'proper', so its been put at an angle.  I've finished the layering with the photo which I've distressed the edges also.
Dusty Attic hinges were painted brown, then distress embossed for a bit of a grungy look, handmade flowers, some little die cut branches, little cones and random cogs finish the embellishing.  The journaling was done on my little typewriter, then stacked up on foam dots for added interest.  The title lettering was painted brown, then finished with crackle accents.

I thoroughly enjoyed making this page, and as usual tried to used different techniques and colour combinations.  I like the look of the stitching with all the distressed edges.
(NOTE TO SELF:  I will have to do more of this)

Thank you for visiting, please come again.

Monday, 16 December 2013

Angelic . . . . NOT

Today I've had my teeth into another layout.  Here are two little rascals, Jack and Harry -  my English girlfriend's grandsons.  This photo is a real miracle as little Harry cannot sit still for more than 2 seconds, and I am told big brother Jack insists on poking his tongue out for photos.  Here they are posing for their Christmas photo, so I hope I have done the photo justice.

 
Here I used two of the same photo, the 1st in colour and the 2nd black & white.  I started by distressing my Kaisercraft paper, then started my layers.  I used old music paper, burlap, drywall tape & muslim under the photos, then added lots of handmade burlap roses, random flowers from my stash, all on top of a lovely little doily.  I've also used lots of  Dusty Attic chippies, DA0729 Branches & Berries, DA0476 Mini words #2, DA0435 Decorative Flourish, which have been finished with gesso, paint, texture paste, stickles & glossy accents.  I've finished it all off with some pearls and charms.


This is the Dusty Attic monthly sketch I have followed.  I will be entering this layout into the following challenges:
 
Dusty Attic - monthly sketch layout
Artfullcrafts - christmas layout    ****WINNER****
Lets Craft & Create - lets celebrate (xmas)
SEM - Christmas
 
Thank you for visiting, I hope all my friends in Britain like what I've done with their precious boys.  I hope you all have a very happy and safe Christmas. 


Friday, 13 December 2013

Mmmm . . . Shortbread

I like to have a little something on standby for a friend, or that last minute gift just as a little 'Thank You'.  I have been playing with the idea of a small goodie box of homemade shortbread, so thought I'd give it a practice run and see how they turn out.

 
I'm extremely happy with how everything worked out.  I've never made shortbread before, and was almost a little scared to try . . . EASY ! !  Next came the little boxes 3" square, made from cardstock with the tops punched, ribbon, cellophane and hey presto. 
So far I've made 6 boxes, all different colours, and I'll just make the shortbread at the last minute.  Each box will hold 8 biscuits, which are cut and stamped as xmas shapes - star, santa, snowman and bauble.
 
I'm going to share this idea with the lovely ladies at Artfull Crafts where they are holding four different xmas themed challenges.   I'll enter this into the xmas gifts challenge.
 
Thank you for visiting, I hope this inspires you to do that little extra also.

Monday, 9 December 2013

Xmas cards

Gee I've done very well this year, all my xmas cards are made and sent out.  I even tried out a new flower to put on each one.  I made a number of cards all being similar, but none the same.
 
What do you think of this lovely poinsettia?? Isn't it wonderful, and so easy to make too.  I learnt how to make this on one of the blogs I follow religiously.  Go and visit the lovely Vicki where she has a link to the easy instructions.  The only alteration I made from the instructions was I actually hot glued each petal to the next petal, I feel it just gives the whole flower a bit more stability.

 
Everything has been hot glued in place, so I hope its all strong enough to survive the post. 
I am entering these cards in the Xmas card challenge at Artfull Crafts and I'm sure I'll find others to enter as well.
Thank you for visiting, and if you are one of the recipients, I hope it reaches you safely and all in one piece.

Friday, 6 December 2013

Eternal Souls

Today I've finally got back into another layout, looking back thru my posts I see not too many layouts at all over the last month or two.  I've decided  I must get back into scrapbooking my 2010 holiday photos, before I totally forget the finer details.  I have mentally hit a bit of a brick wall now I'm up to the Egypt photo's, as the colours are all the same - drab, and flowers and other pretties just don't cut the mustard.  Hopefully I'll be able to use some inspiration from other sources as I have for this layout i.e. following a sketch.
 
This amazing photo was taken during the Light & Sound show we attended at the Great Pyramids of Giza, and BOY what a show! !  Sadly this was the only photo that actually turned out half decent, if you look hard you can just make out Khufu's Great Pyramid behind the Sphinx.  We were taken on a grand ride thru thousands of years of Egyptian history, it was so surreal, more like a fairy tale until you get to see and touch all the magnificent pyramids, temples, tombs & monuments left behind still standing the test of time.  I was even lucky enough to go down inside one of the smaller pyramids . . . AWESOME ! ! !
 
While doing my DT duties (commenting on entries) I came across an exciting looking sketch from Sketchabilities and straight away I thought of this amazing photo, which has just been waiting for the right sketch or paper or something???? to get me going.
 
I started with a G45 paper, then layered on several other random papers, along with muslim, hessian, corrugated card, lace, string, TH flourish die, handmade hessian flower, Dusty Attic Paris Post Mark DA0320, Mini Words #2 & #3 DA0476 & DA0477, distress ink & Hero Arts stamps - Tour De Luxe. 
 
I thoroughly enjoyed creating this layout, and now hopefully I will carry on with some more, strike while the iron is hot as they say.  I hope I have shown you into a little more of my amazing holiday, with more still to come.  Thank you for visiting.

Wednesday, 4 December 2013

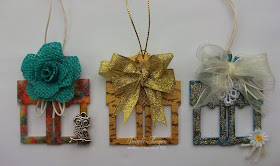
Altered chippies

The weather has been unseasonably wet the last few days, so its been great to get my teeth into a bit of serious crafting.  I have been wanting to make some new xmas decorations for some time now, so this was a great chance to get stuck in.

 
Recently I bought a set of plain chipboard xmas decorations from Spotlight.  They were actually quite nice and  could have gone on the tree as they were . . . but NO . . . I couldn't help myself . . .
 
 
I tried to use as many mediums, techniques and embellishments that I could.  I had real fun.
Day One: I used gesso, paint, PVA, texture paste, stickles
Day Two: Alcohol ink, more stickles, crackle paint, glossy accents, ink, stamps, ribbon, hessian, feathers, music paper, lace, charms, pearls, buttons, string, glitter, trim


This has been real fun, now its time to get the xmas tree out I suppose.  But no, this year we are having the whole family here for xmas day, so I'm planning on putting up a REAL tree for a change.  I'll get onto that job later next week I think.
 
I will be sharing these with the lovely ladies at Artfullcrafts where one of their challenges this month is 'Xmas Decorations'.  Come on over and be wowed by the other wonderful creations.
 
Also a big thank you to Roberta from Scrapping Everyday Miracles with an invite to come and participate in their challenges.
 
Thank you for visiting, I hope these will inspire you to make some for yourself.
 

Saturday, 30 November 2013

Secret Santa sssshhhh.....

Time for another new challenge at Creative Craft Cottage and wouldn't you know it the theme is Christmas (of course).  Here I am sharing a secret santa gift box I have sent thru to another kindred crafty spirit in Australia.  It is, of course, full of crafty goodies.


I started with a paper mache box which I gesso'd, then painted green.  I then covered the outsides with santa serviettes.  I've finished with ribbon, bows, doily, xmas trinkets, and a handmade burlap flower (did I say how much I LOVE these???).  They are sooo easy to make, have a look here for easy instructions.
 
Please share your wonderful xmas creations with us and be in with a chance to win a lovely little prize.  As always, if you don't have a blog, feel free to email your entry thru to us.

Thursday, 28 November 2013

Xmas tags

Time for another challenge at Southern Girls Challenge, so this time we at Team Lou are showing you some lovely 'Texture' (lumps, bumps and all). 
 
 
Here I have created some xmas tags, taking bits of ideas from two friends creations - Sue & Fiona, and blending them together.  Firstly I've die cut my tags using Tim Holtz dies, then embossed them.  I love the look of the corrugated card with the lace & ribbons, and love using manila cardstock as well.

 
I've actually already sent two of these off with other goodies, and I suppose there's no reason why you couldn't even hang them on the tree if you really wanted to.  These were very easy and quite fun to make.
 
Please now share your lovely creations with us at Southern Girls Challenge for the chance to win some lovely prizes.  Remember if you don't have a blog we are quite happy to accept emailed entries.
Thank you for visiting, we look forward to seeing your entries.

Monday, 25 November 2013

2014 Calendar

Again this year I have joined in on the Calendar swap at Artistic Creationz where I was chosen to create pages for July & August. 

 
These only measure 4" x 4", and I had to make 6 sets.  I'll keep one, and swap with the other girls for the other months they are creating.  When I have them all I will punch holes in the top so they can be bound in a rolodex style.
 
For those of you in the Northern Hemisphere don't forget we are mid winter in July, and August has the stirrings of spring, hence my selection of papers used.
 
I will be entering this into the latest challenge at Lets Craft & Create with the theme of 'Glitter'.   ***WINNER***
Thank you for looking, please leave a comment.

Saturday, 23 November 2013

Rottnest Island

I have been spoilt with lovely photos to be included in my layouts, so only by choosing my embellishments firstly did I decide which photos to use.  Todays layout is being entered in the monthly sketch layout at Dusty Attic where I worked to this sketch:

 
Recently when we visited Perth I came across a scrapbooking shop which has LOTS of Dusty Attic chipboard.  I was like a kid in a candy store and shopped till I dropped (so to say).  I was even thrilled to come across the title of this layout 'Rottnest Island' which is a small island just off the Freemantle/Perth coast, where we spent the day.


I love how all the colours work together, don't ask me where the orange came from but it works (I think).  Here I've used G45 and other random paper, several different trims, flowers from my stash, TH distress inks and of course lots of DA chippies, which include the title 'Rottnest Island' - DA0169, barbed wire from the Rustic Charm set - DA0665, and of course Dusty-in-Bloom - DA0802.
 
We had a great day out on the island, where we hired bicycles and peddled round the island.  Unfortunately we got caught in the rain when we were on the far side of the island at the lighthouse.  Luckily it was warm, and we did quickly dry out.  It was a long day as we had trained down to Freemantle early in the morning to catch the first ferry out, then upon our return again we trained back through to the north side of Perth.
 
Its great to find sketches which allow you use more than one photo, as its always awesome to show off holiday photos this way.  I hope you like my interpretation of the sketch.  Please leave a comment, your thoughts are always greatly appreciated. 


Wednesday, 20 November 2013

Art Journal 4

Another month is now well underway, so here I have completed my page in the latest journal in the Creative Dreams monthly Art Journal challenge.   Now being in the fourth month its great to see some of the other girls contributions as well.  This is Allies journal, and she was clever and created the book herself by including magazine pages, photocopy paper, odds and scraps of cardstock and manila folder....etc.  Its actually more of a junk journal or smash book, lots of options here to work with.


The theme of the journal is "What does home mean to you?", so I've gone along the lines more of scrapbooking than arty, and shown her what "home is ...." to me.  The two outside pages are actually magazine pages, which I gesso'd, leaving some of the words showing thru, then used templates (brick wall), paint, colouring pencils, distress inks & glimmermist, then lots of photos and even a favourite recipe.
 
Its always a pleasant surprise to see what secrets and expectations the next journal brings, a great learning curve.  I am really enjoying being part of this group.

Tuesday, 5 November 2013

Treats for Hospice

Didn't I say in my last post that I'm enjoying making these little gift boxes??? Well here is some more.  These were made as my contribution to a trading table to raise money for our local hospice.  Last weekend was the annual "House & Garden" ramble, with all proceeds going to Hospice, so when asked to help out on the trading table, how could I resist.

 
These are just little 3" square paper mache boxes which I painted on the inside and bottom, then covered with G45 papers.  To decorate I've used flowers, feathers, pearls, doily & string.  Inside the bottom is lined with muslim, then they have been filled with Roses chocolates. 
 
I asked $10 each for them, and believe it or not within an hour one lady came and actually bought the lot as she couldn't decide which one she liked the best.  
Woooo hoooo, didn't I do well.

Friday, 1 November 2013

Another Gift Box

I just can't help myself at the moment, as here is yet another gorgeous gift box.  This is my DT entry for the latest challenge at Creative Craft Cottage where the theme this time is 'Say it with Flowers'.


As the colours in this G45 paper are so rich I had to be very careful with my choice of flowers.  Here I have started with the burlap rose (which I've just learnt to make), then complimented it with more soft coloured flowers.  The buds I've used were actually blue, but everything can be painted can't it?  A small doily under everything was also painted to match.


I actually created the box primarily to send a journal back to its owner, then decided this person deserved a little bit more.  I've filled the box with all sorts of goodies I hope she can use, topped off with doilies and a few handmade xmas decorations.


I'm really pleased to have learnt to make these burlap roses, they are really very easy.  I followed instructions I found here on You Tube.  I actually received a few in a swap, and have always wanted to make them for myself.  I'll definitely be making more of these.
Thank you for visiting, and please join us with your entry at Creative Craft Cottage.  As always, if you don't have a blog, just email your entry thru.

Thursday, 31 October 2013

Sweet Treats

Well its time for another new challenge at Southern Girls Challenge, how time is flying.  The girls have come up with the fabulous theme of 'Sweet Treats', gee that really could be anything couldn't it.  At this time of year its nice to create some small gift boxes containing small bits and pieces, and of course homemade sweets. 


This one I have here was given to the owner of a small curio shop, who gave me a fabulous deal on some old doilies and pearls (who doesn't like a little extra 'thank you' gift sometimes?).  She was completely gobsmacked and again gave me another great deal.

We have a 'garage sale' for the local hospice coming up in the next few weeks and if time permits I hope to make more of these to put on the sales table.  As long as the price is reasonable I'm sure they'll sell like hotcakes.

Thank you for visiting.  I hope I have inspired you into making some of your own gifts, afterall nothing tastes better than homemade does it?

Saturday, 19 October 2013

Xmas Decorations

I am trying to hide my head in the sand about the fact that its nearly xmas, but I'll just have to accept the fact especially now lots of sites are putting up their xmas challenges.
Here I have found this photo of quilted xmas baubles I made for a swap last xmas.  I had never entered into such a challenge before so had to do a lot of research on You Tube.  Wow the ideas abound, but I really liked the idea of these little baubles basically made from fabric scraps pinned on polystyrene balls.  You'll find full instructions here

 
Next is this gorgeous little crochet xmas stocking, which I found on another challenge site.  Instructions for these cuties are here
 
 
Lastly I came across these interesting paper baubles, made from 20 circles of paper glued together.  Learn how to make these here

 
I love making these as pre xmas gifts.  All are made from scraps which is very thrifty. 
 
I am entering my quilted baubles in the latest challenge at Lets Craft & Create where their theme this time is 'Trim the Tree'.
 
I hope you like my creations, and you too can make these following the links I have left for you.  Please leave a comment.  Thank you for visiting.

Tuesday, 15 October 2013

Halloween Flowers

Today I'm sharing some flowers I've just made for a Halloween swap at Artistic Creationz.  These will be going to Sue, I hope she will be able to use them.  As they are layered up, I have actually made them so she can pull them apart if she wants and use each individual layer as a separate flower.


These yo-yo flowers are all made from satin fabric, with a black lace layer in the middle.  The orange one has one of my little crocheted flowers as its top layer, then they are all finished with a small black mini rose as the cherry on the top. 
 
The box is just a bit of cardstock with lovely Halloween paper attached.  I will tie it all together with black ribbon.
 
As I mentioned above each layer is attached with a glue dot, so if she wishes it won't be too hard to actually pull these apart and use each layer separately.  I hope she likes these as much as I've enjoyed making them.


Sunday, 13 October 2013

Precious Moments

Isn't it lovely when you are spoiled with lovely photos to scrap.  This photo of my niece Zana was taken in a professional photo shoot when she and her mother visited my sister in Australia in 2011.  The pose is awesome and I adore the black and white finish of the photo


This layout has been made following the Dusty Attic monthly sketch.  I started with random paper from my stash, a lovely big doily, lace & trim, lots of  DA chippies, and luscious flowers (handmade and prize winnings).  I've finished the page with lots of bling, black rhinestones as the chain for the bird cage, red rhinestone flourish and clear rhinestones dotted throughout.
 
The Dusty Attic chippies I have used are:
DA0720 Birds Nest #1 - gesso'd then inked
DA0476 Mini words #2 - painted, glossy accents
DA0435 Decorative flourish set - gesso'd then stickled
DA0678 Bird cage #5 - painted
 
Challenges entered with this layout are:
Dusty Attic - monthly sketch layout
Artfull Crafts - pink

Friday, 11 October 2013

Art Journal 3

Wow how time flies.  Here we are already the middle of the month.  Definitely time to be getting on with things.  Here I've finished my page in the next art journal I'm doing with the ladies at Creative Dreams.  Being involved with this is really making me think outside the square in a real fun way.  Anyway here is my effort I've done in Jules' book.


She asked for spring colours, so whats better than these fluro Kaisercraft paints?  I spread the 3 colours across the pages with a credit card, then used random templates & stamps in black and white.  The background word stamp was stamped onto tissue before gluing on the page, then also painted.  Magazine cutouts were attached, then outlined with painty pens (black and white).  I finished the page with lots of spots and blotches, rhinestones & distress inks.

Inspiration for the background came from 'Mixed Media Jenn' on You Tube and I also used  techniques that I used on the previous page.  This was a real fun page to create and once I had the colours and ideas sorted in my brain this only took 2 evenings to actually create.

This is also being entered in the Lets Craft & Create challenge which is 'Ink Technique'.

Tuesday, 8 October 2013

Candy Station swap

I made this 'Candy Station' aka 'pretty box of lollies' in a swap for Paula at Artistic Creationz.  The brief was to decorate a box no bigger than 6" x 6" x 2", and to use a spring theme.

 
Sadly nothing I tried came out looking like spring, but I love how its turned out anyhow.  I've used lots of hand made flowers here again, with pearls, laces and trims to finish it all.

 
The goodies inside are all homemade:  Russian Fudge, Hokey Pokey and Candied Figs, yummy.  Now I can't wait to see what Paula has made for me.