Pages

Friday, 31 January 2014

Pelicans

Last day of the month and just in time to enter another challenge.  Inspiration for todays layout has come from the lovely Mistra at Donna Salazar Designs, just another great challenge blog I've come across recently.  Not only do they supply a sketch to follow, its also a colour challenge as well.


I got the colours as close as I could with the supplies I had, I hope they like it. 
Part of the criteria to enter was to use some DSD products, and as I had a very limited supply I had to wait until this 11th hour to start work.  Here I've started with a DSD Trunk in the Attic paper 'Banana Nut Loaf' (gotta love the names), which I grunged up with distressing, stencils with ink, paint & modelling paste.  Next came the lovely old doily, then the lovely photos.  Under the flowers I've added some of the trim that came in the Trunk in the Attic kit & lots of Dusty Attic chippies DA0660 Grass Cluster #1, Cyclone wire DA0737 & mini words #3 DA0477.  The grasses were sprayed with Dylusions Ink sprays, then flocked & glimmer misted.  The flowers are a mixture of I am Roses (daisy & rosebuds), Spellbinders bitty blossoms & Marianne designs die cut mini roses, again ink sprayed or glimmer misted.  To tone down the brightness of the page I've dabbed around a bit with DSD Mix'd Media inx - Jasmine.
 
Here's a couple of close ups of the beautiful flowers, which are so easy to make.


I loved making this page as these are colours and style I seem to migrate to a lot.  
Thank you for visiting, come and join me in this new fun challenge.

Saturday, 25 January 2014

Jan IAR Challenge

Here is my entry for the latest fabulous challenge site I have found.  I Am Roses is running monthly challenges, with the enticing prize for the winner of their gorgeous flowers.  This month they are asking for projects with 'White Flowers'.  Not too hard I thought.  Their only criteria is that you must use at least 2 of their products . . . again, not too hard. 


This is my entry - an altered mousetrap covered with beautiful flowers.  You'll see below I've actually used 3 different types of white flowers.  All these mousetraps have actually been made for a swap with the girls at NZ Paperchase.  What a fun idea!


I started by pulling off all the 'excess' bits, then painted the whole thing with gesso.  Once dry I covered them with netting, then glued some trim around the outside edge.  This was then all given a coat of Lumiere paints . . . beautiful. . . . but then what to do ? ? ?

Firstly I was going to get carried away with some collage, but that wasn't going to work how I saw it in my head in such a small space.  Then I was going to go down the '70's way of thinking with big bright flowers, arrows and the such like, but then I came across this IAR challenge . . . yay decision made! 
I've placed Daisy's, cherry blossoms and rosebuds on top of random leaves, then under the 'trap' I've glued a small Spellbinders Shapeabilities 'Wrought Iron' fence die cut.  The wording is up on foam dots and has been finished with Crackle Accents.

This has been such a fun challenge to be in, now I can't wait to get my swapped mousetraps from the other ladies. Now my next big decision is to pick which one to keep for myself (I think it might have to be the terracotta & blue . . . I love this combination).
Fingers crossed for me at IAR. 

Tuesday, 21 January 2014

Grandma's love

The weather has been wet and windy the last 2 days, so I've been stuck inside.  Once all the housework is done I've had nothing else to do but craft . . . oh dear, how sad . . . NOT.
Todays layout has been made using the Dusty Attic monthly layout sketch.

 
After doing lots of grungy & male projects, I decided it was time for a softer 'girly' page.  I am lucky to have lots of awesome photos of my sister with her daughter & granddaughter.
 
All the papers I have used are just random papers from my stash.  I had fun preparing the background, by distressing, punching, stitching, stamping, using my templates and texture paste.   Next I created the layers under the photo, again all punch, distressed & inked.  Muslim and lace have helped to soften the edges as well.  On top of the photo comes the beautiful DA chippie 'Vine' DA0459, which I dabbed with green paint & gesso before finishing off with these gorgeous cherry blossoms.  The lettering is also DA chipboard, 'Mini Words #3' DA477, also painted green.

 
This closeup shows off the vine with its gorgeous flowers.  I decided to use the black and white photo, so as not to make the page too 'busy', especially with all the layering underneath it.
 
I LOVE using the Dusty Attic chipboard, it is so versatile and comes in some pretty incredible shapes & sizes.  Infact I think I use it on nearly all my projects.
 
Thank you for visiting, I hope you like what you see.  Please leave a comment.


Monday, 20 January 2014

Travel journal

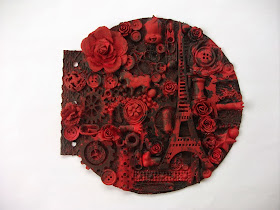
Over at Artistic Creationz they are now taking entries to join in the annual Circle Journal, so while I've got a bit of time up my sleeve I've made a start to mine.  Firstly to think of a theme . . . once that was established the whole idea of the shape/size/construction of the journal was quite straight forward.  I also wanted to do something quite different to the norm.

 
This collage was such fun to make, and surprisingly easy.  The whole idea hinged around the availability of the Eiffel Tower chipboard, which luckily Spotlight did have in stock.  I have taken a few photos to show you the different easy steps.
 
 
I started with just a piece of cardstock.  After creating the background by sticking on some 'texture' (muslim, tissue, lace, netting, etc) I hot glued all the bits in place (as you can see there is allsorts here - even a dismembered doll).


Everything then got a generous coating of gesso.

 
Then the fun part really started.  I painted the whole thing in red, then the base got a touch of black paint and coffee shop glimmermist (to tone down the red a bit).  When this was all dry I touched up the red again (several times), leaving the black background.  Then to attach the label.  The whole page has been finished off by highlighting areas by dabbing on some gold rub'n'buff.  I LOVE how its turned out, and by the comments and 'likes' on facebook, I think I've done myself proud.
 
I hope I have inspired you to try something similar, it is soooo easy and fun to do.  Thank you for visiting and for all your lovely comments.
  

Art Journal 6

Its real fun being involved with these Creative Dreams art journals, so much so as soon as I receive the next journal I have to get straight onto it even though I've got the whole month to complete my pages.  Believe it or not we are actually half way thru the group already, as we had 12 start at the beginning to last 12 months.

 
Again I've gone with something totally different to anything I've done before, infact until I'd finished the background I still didn't quite know what I was going to do.
 
I started the pages by randomly stamping some tissue paper before gluing down.  Next I rubbed a bit of blue paint in odd places just with my fingers, followed by a bit of random splotches of gesso.  I then sprayed the 2 outside edges with Dylusion Ink spray (London Blue) and water and allowed that to dribble across the pages.  When this was all dry I got out a couple of stencils and made random patterns everywhere.
 
This is when I  struck my problem "WHAT TO DO NOW ? ? ?"
 
I found some serviettes with these cute birds & flowers so decided to go with the tree idea.  Even though I'm no artist I drew this tree using a brown marker pen, followed with a bit of texture paste.  I tore the birds and flowers up then adhered them to the page.  Lastly came the saying I found online  "A bird doesn't sing because it has an answer, it sings because it has a SONG  -  Lou Holtz".  I finished the page by inking the edges with Black Soot TH distress ink.  All in all I think this probably took me about 6 hours to complete, even having to wait for layers to dry.  Infact the drying time was minimal as it is SOOOO hot here at the moment.
 
Again I have thoroughly enjoyed the chance to contribute to this great project and if any of you out there come across something like I would recommend you jump in feet first and seize the opportunity as this is a great way to experiment and learn soooo much, it really pushes you outside your comfort zone (in the nicest way of course).
 
Thank you for visiting, please leave your thoughts and check out all the previous art journal pages I have done here.

Thursday, 16 January 2014

Lost in Thought

Well its a New Year already and here at Southern Girls Challenge we are celebrating by inviting you to show us your new things with the latest theme being 'Out with the old and in with the new'.  As usual we have fabulous sponsors onboard for this one, so here I am showing off my new Martha Stewart Doily punch, which I LOVE . . . . AND using scrummy embellishments from the fabulous Retail Girl . . . (I'm drooling now). . . simply love all her flowers and pearls.

I started this layout by punching the circle page from Donna Salazaar paper, added an old doily, distressed my photo, then got crazy with the gorgeous flowers (some from Retail Girl, and some I've made myself).  I learnt lots from watching Tash on You Tube, who is now the new designer for Retail Girl. . . beautiful work girl.  A gorgeous Kaisercraft pearl flourish, and Retail Girls flatback pearls finish off the page.

I LOVE this page, the colours, the flowers, the pearls are ALL so YUMMY.  What a perfect coincidence I was wearing this colour dress for my photoshoot.

Thank you for visiting, please leave a comment as I will when I visit your creations.  Remember you can email your entry into us if you don't have a blog entry to link. 

Sunday, 12 January 2014

Catch of the Day

Todays layout is letting me share with you a fantastic day spent fishing on a friends boat.  We started the day at 4.30am to travel firstly to the marina, then out to the islands of the Hen & Chicks, 20km odd outside the Whangarei harbour.  The weather and sea were perfect all day, and the fish were biting well. 

 
I've used the sketch from Once upon a Sketch to show off my big catch.  Sadly the colours in the photo were shocking, and I couldn't get them to where I was happy to put them on a page, so I decided to go with the black & white photo instead (not ideal, but it works).  Along with the sketch, the theme at OUAS was "Lessons Learnt", so here OF COURSE I am sharing the fact that "Girls can do Anything".
 
I started the page with papers from Basic Grey, Karen Foster & BoBunny, distressed edges, stitched, inked, glimmer misted, stamped.  After layering on the photo with a bit of bakers twine, I handmade most of the flowers using my Spellbinders Bitty blossoms & Marianne designs dies & finished them off with some of Louise's beautiful pearls.  Pieces of Dusty Attic cyclone wire DA0737 compliment the page also.
Enjoy this lovely closeup of the flowers & pearls.
 
 
Thank you for visiting, have a happy, crafty day.


Wednesday, 8 January 2014

Adorable

Believe it or not with the weather being sooo hot, I'm finding it more pleasant to be inside crafting rather than outside doing other stuff.  Oh dear how sad . . . not.  That's given me the chance to make a start with the monthly challenges starting with this gorgeous page I've made for Scrapping Everyday Miracles.  The monthly theme is "Friends Forever", so I've incorporated this theme with their monthly LO sketch as well (2 entries here I think, hehe).

 
Son Troy adores his pets, and they adore each other.  Sadly Troy & his partner have moved to live in Australia, so has left his pets to live here with us.  Luckily the animals have settled into our lives well.  When Troy does come home to visit they all spend a lot of time together as if he never went away. 
 
 
I found the embellishments fitted better by using the sketch turned once clockwise.  I started with an Authentique paper which I  spritzed with a bit of glimmer mist firstly (crème de chocolate & coffee shop), inked a few random patches with a honeycomb stencil, then stuck on a bit of dry wall tape.  Background completed it was easy to place these gorgeous photos, then compliment with these flowers and painted Dusty Attic chipboard, which I softened by placing on top of mini doily's and muslim.  DA pieces used were DA0941 Adorable & DA0868 Birds on a Barb Wire.
 
It is much easier making a page when you have such lovely photos to work with I find.  Thank you for visiting my page, thank you in advance for all your comments. 
 
***WINNER***
 

Saturday, 4 January 2014

Altered Journal

 I thought it was high time for a new 'notebook' to help keep track of all my upcoming commitments and monthly challenges, so I decided to alter a rather plain Dusty Attic journal .  My poor notebook I have been using was well and truly ready for retirement.  So here it is:

 
Here I have used techniques I learnt from the lovely Dusty Attic DT's.  Firstly I followed what Belinda has done to create the textured background.  I started by painting the surface with gesso, then when dry I glued on ripped book paper.  When this layer was dry I used a stencil and a credit card to apply a layer of gel medium.  Next I rubbed over some distress ink (peeled paint, tumbled glass & mustard seed).  Dylusion Ink sprays (London blue & white linen) came next, then I finished with a stencil and some texture paste


 For the next stage I followed  Gabrielle in her stunning video.  I started by gluing on all my embellishments,


Then it was all given a coat of gesso,

 
Then I painted it all with Pearl Blue Lumiere paint,

 
When this was all dry I touched everything up with a very light dabbing of gesso, sprayed patches with glimmer mist (Crème de Chocolate), again more gesso, then finished with another few squirts of the Dylusion Ink spray just to give it a big more brightness.
Here are a few closeups before the last squirts of Dylusion Ink. 


I love doing these collages and must find the time to do more.  I am very happy with how this has turned out, and am very impressed with the Dylusion Ink sprays, which I've not used before (it might be a good excuse to get some more).
 
Thank you for visiting, please leave a comment I love to hear what you think about my work.